無縫整合主流 DevOps 與 CI/CD 工具鏈
取代脆弱的傳統腳本,運用 AI 與無程式碼技術,大幅提升自動化測試的穩定度與產能。
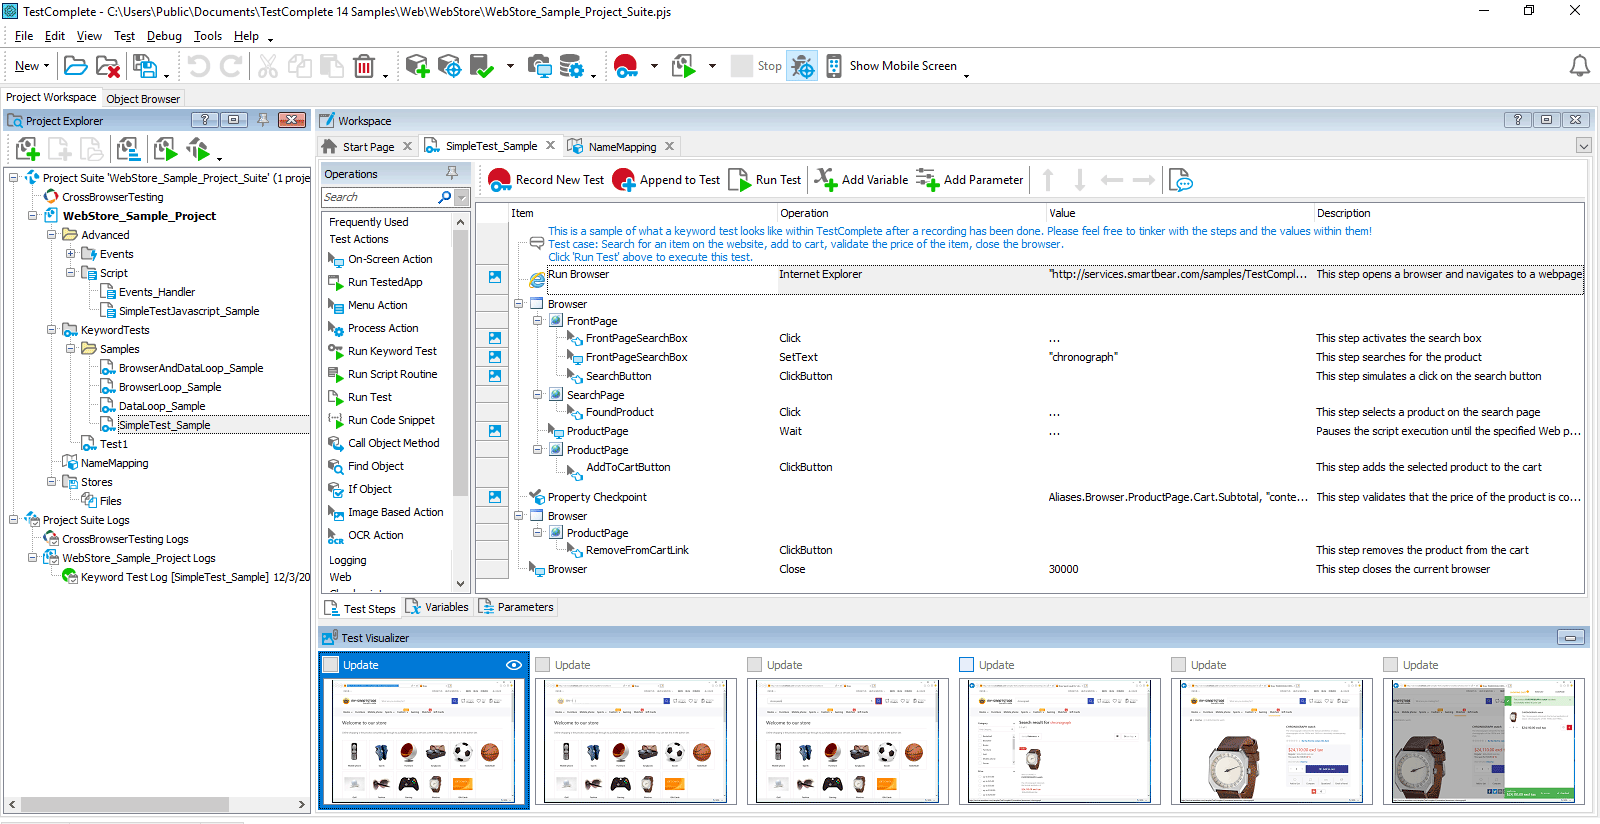
結合屬性與 AI 視覺辨識 (OCR),精準鎖定動態與複雜 UI 元素(包含 PDF、圖表等),全面突破測試盲區與限制。
AI 能自動偵測 UI 變更並替換失效物件,推薦替代方案,大幅降低測試失敗率與耗時的腳本維護工作。
提供直覺的錄製回放與拖曳功能,免寫程式碼,讓非技術背景的 QA 也能輕鬆建置強大的自動化測試。
單次建置腳本,即可在 Desktop、Web、行動裝置等多種作業系統與真實瀏覽器環境中無縫執行,支援 500+ 控制項。
運用 LLM 技術,只需輸入文字指令即可瞬間生成擬真、安全且高度客製化的龐大測試數據庫驅動測試。
支援跨實體機與虛擬機平行執行測試,並無縫整合各式 DevOps 工具鏈,產出統整報告,極大化縮短交付週期。
從原本耗時「兩週」極致壓縮至半天,加速衝刺 (Sprint) 與版本發布。
企業客戶實際案例,從 0% 飆升至 88%,累積數萬個測試腳本,實現規模化測試。
透過 AI 自動修復技術避免因 UI 變動導致腳本失效,省下無效的維護成本。
Selenium 或 Appium 雖然免費,但隱藏的維護成本極高。看看 TestComplete 如何解決這些痛點。
點擊觀看 TestComplete 快速 Demo,了解如何解決企業測試自動化的痛點
開源工具常因 UI 屬性微小變動就導致測試中斷與大量失敗。TestComplete 具備 AI 自動修復(Self-healing)能力,當偵測到變更時,能自動推薦替代物件,將成功率推升至 95%。結合 OCR 視覺辨識,連複雜網格中的動態物件也能精準抓取。
Selenium 和 Appium 高度依賴工程師撰寫程式碼。TestComplete 提供 No-code 錄製與回放,以及直覺的關鍵字驅動拖曳操作,讓業務分析師或一般 QA 也能輕鬆建置。同時,依然支援 JavaScript、Python 等多種語言供進階專家使用。
不再需要拼湊多種工具來涵蓋不同專案。TestComplete 是一站式測試平台,無論是現代的 React/Angular 前端網頁,還是傳統複雜的企業套裝軟體如 SAP、Oracle、Salesforce、WPF,只需一個工具就能無縫應對跨平台技術堆疊。
依據您的專案規模與測試環境需求,選擇最符合成本效益的訂閱制報價方案。
價格最實惠的入門方案。授權綁定於單一實體機器或虛擬機上,適合專職的 QA 工程師或小規模測試團隊的個人電腦使用。
企業級彈性方案。透過區域網路或 VPN 共用授權池,允許多位工程師在不同電腦上輪流使用,極大化軟體投資報酬率。
TestComplete 採用 Base (基礎版) + Add-on (擴充模組) 的計價結構。您可以根據實際測試需求,自由選擇加購 Desktop (桌面)、Web (網頁) 或 Mobile (行動裝置) 測試模組,買你所需,絕不浪費。
The Bainian BND-50/SE36 (often branded under HBN or Camelion) is a weekly digital timer plug designed to automate household appliances with high precision. Whether you are managing grow lights, security lighting, or coffee machines, this guide provides the full instructions for setup and programming. 1. Initial Setup and Charging BND-50/SE36
features a built-in Ni-MH rechargeable battery to save your settings during power outages.
Plug in to Charge: If the LCD screen is blank, plug the timer into a live power outlet for at least 12–24 hours to charge the internal battery.
Master Reset: Before first use or if the screen freezes, press the small "R" (Reset) button with a paperclip or pen to clear all previous settings. 2. Setting the Current Time and Date
You must set the current clock time before programming any schedules.
Set the Day: Press and hold the "CLOCK" button while simultaneously pressing the "WEEK" button until the correct day appears at the top of the screen.
Set the Hour: While holding "CLOCK", press "HOUR" to adjust the hour.
Set the Minutes: While holding "CLOCK", press "MIN" to adjust the minutes. 3. Programming the Timer (8 ON/OFF Groups) This model allows for up to 8 independent ON/OFF cycles.
Enter Program Mode: Press the "PROG" button. The display will show "1 ON".
Select Days: Press "WEEK" to choose the day combination (e.g., daily, weekends only, or specific days like Mon-Wed-Fri).
Set Start Time: Press "HOUR" and "MIN" to set when the device should turn on. bnd50 se36 instructions full
Set End Time: Press "PROG" again. The display will show "1 OFF". Use "HOUR" and "MIN" to set the turn-off time.
Save and Repeat: Press "PROG" to move to the next group ("2 ON") or press "CLOCK" to exit and save. 4. Understanding Operational Modes
Use the "MANUAL" (or indicator) button to toggle between these three states: ON: The outlet is permanently powered. OFF: The outlet is permanently unpowered. AUTO: The outlet will follow your programmed schedules. 5. Special Features
Random Mode (Vacation Mode): Press the "WEEK" and "HOUR" buttons simultaneously. A small "O" or "R" will appear on the screen. This varies your set times by 10–30 minutes to make it look like someone is home.
Summer Time (DST): To quickly adjust for Daylight Savings, press "HOUR" and "MIN" together (on some versions, press "CLOCK" and "TIMER") to advance the clock by one hour. Technical Specifications Max Load 13A / 240V (typical UK) or 16A / 230V (EU) Minimum Interval Maximum Time Protection IP20 (Indoor use only)
For further assistance, you can find the original digital manual hosted on the Panda BG resource archive. Instruction Manual
BND-60/SE36 (often referred to as the BND-50 or HBN timer) is a 24-hour mechanical outdoor timer used to automate lights, pumps, or decorations. Quick Setup Guide 1. Set Your On/Off Times Push Pins Down : Each "pin" or "segment" around the dial represents 30 minutes (some models use 15 minutes). Push the pins for the times you want your device to be Keep the pins for the times you want your device to be 2. Align the Current Time Rotate the entire gray dial until the small arrow on the inner face points to the current time of day
: The dial usually indicates AM/PM via white and black sections (White = Day/AM; Black = Night/PM). 3. Choose Your Mode Locate the override switch (usually on the bottom or side). Timer Mode (Clock Icon) : Slide to this icon to run your programmed schedule. Always ON (I/ON)
: Slide here to bypass the timer and keep power flowing constantly. Troubleshooting Tips Not turning on? Ensure the override switch is set to the Clock Icon , not "ON". Pins won't move?
Make sure you aren't trying to push a pin that is currently aligned with the internal trigger (rotate the dial slightly if it feels stuck). The Bainian BND-50/SE36 (often branded under HBN or
: To change your schedule, simply pull the pins back up and push down your new desired times. Do you need help calculating the energy savings for a specific schedule?
How to Set Up and Use a 24-Hour Segment Timer | Easy DIY Tutorial
To program the BN-LINK BND-50/SE36 24-hour mechanical timer, follow these steps to set the current time and your desired schedule: 1. Clear Existing Pins
Before starting, ensure all the gray pins around the outer edge of the dial are . In this position, the timer is in the "OFF" state. 2. Set Your "ON" Times Each pin represents a
the pins for the specific time periods you want your device to be "ON." For example, to have a light on from 6:00 PM to 10:00 PM, push down all pins between those two markers. 3. Set the Current Time Rotate the entire gray dial
until the white arrow (located on the inner circle) points to the current time of day.
The dial is divided into a 24-hour scale. The dark-shaded portion typically represents PM hours (6 PM – 6 AM), while the light-shaded portion represents AM hours (6 AM – 6 PM). 4. Activate the Timer
Locate the red (or black) override switch on the side of the unit. Slide it to the Clock Icon (Timer Mode) to follow your program. If you slide it to the
position, the timer will provide constant power, bypassing your schedule. 5. Installation Plug your device into the timer outlet. Ensure your device's power switch is in the Plug the timer into a live wall outlet.
For more visual guidance or related products, you can visit the BN-LINK official site or retailers like to view user reviews and manual snippets. for a complex schedule? Sharp Objects: Always place knives and sharp utensils
The BND50 SE36 appears to be a specific model or product, possibly related to technology or electronics, but without more context, it's challenging to provide a precise description or instructions. However, I can offer a general approach on how to find or understand instructions for a specific product, using the example of the BND50 SE36:
Identify the Product: The first step is to confirm what the BND50 SE36 refers to. Is it a piece of electronic equipment, a software tool, or perhaps a component for a larger system?
Manufacturer's Website: Most manufacturers provide detailed instructions, user manuals, or datasheets for their products on their official websites. If BND50 SE36 is a product from a specific company, visiting the company's website and searching for the product model can yield relevant documentation.
The BND50-SE36 features automatic sensors that adjust water temperature and duration based on the load's soil level.
| Cycle Name | Purpose | Duration (Approx.) | Temperature | | :--- | :--- | :--- | :--- | | Auto 45-65°C | Mixed load; standard daily use. The sensors detect soil level. | 110 - 150 min | Variable | | Eco 50°C | Energy-saving cycle for normally soiled dishes. Best water efficiency. | 180 - 210 min | 50°C | | Intensive 70°C | Heavily soiled pots, pans, and dried-on food. | 120 - 140 min | 70°C | | Glass 40°C | Delicate glassware and temperature-sensitive plastics. | 80 - 90 min | 40°C | | Quick/Turbo | Lightly soiled dishes requiring a fast turnaround. | 50 - 60 min | 45-65°C |
Auxiliary Functions:
To restore your BND50 SE36 to original state:
For TV Receiver:
For Relay Module:
聯繫創世資訊顧問團隊,我們將為您安排專屬的 Demo 展示與免費試用評估。
送出即代表您同意我們的隱私權政策,我們的服務人員將於 1-2 個工作天內與您聯繫。